Making mazes using Minimum Spanning Trees
Making mazes has never been so fun! This post is a high level look at an interesting way of generating random mazes.
Background
Oftentimes, students of Computer Science will discover that a lot of the interesting data structures and algorithms they learn throughout the years never seem to really have useful applications in the actual reality of their software engineering or development jobs.
Thus, when I came across this technique for generating simple mazes that gave me an excuse to dust off a few of those things I'd learned as an undergraduate but never looked at again, I had to give it a try.
This article is going to make use of the following, but will not go into too much detail about them. Check the footnotes for good Wikipedia links for you to explore further!
- The disjoint-set or union-find data structure1
- Undirected graphs2
- Minimum spanning trees (MSTs)3
- Kruskal's Algorithm for finding the MST of a graph4
Warning
Be advised, this article is going to serve as an outline for how to perform the described technique, but many details will be left out. If you'd like to see an implementation of a maze generator written in Python using this strategy, you can find one here.
Step 1: Establishing the Field of Play
First things first -- we need a way to represent our maze in code. Without this, this maze train won't even leave the station!
To do this, I first have to quickly cover a very special kind of graph2 called a lattice graph5. A lattice graph is a graph where the nodes are arranged in a specific tiling pattern -- in this case, we'll use square lattice graph so that our nodes are arranged in a chessboard-like grid pattern.
To make our eventual maze easier to view, I'm going to use the matplotlib library in Python and its pcolormesh function (with some special configuration) to draw our nodes as white squares on a black background, as you can see in the picture below. Note that our graph currently has no edges!
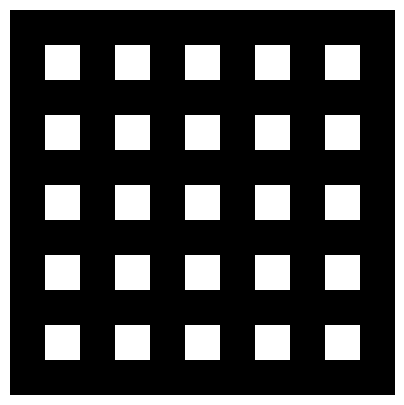
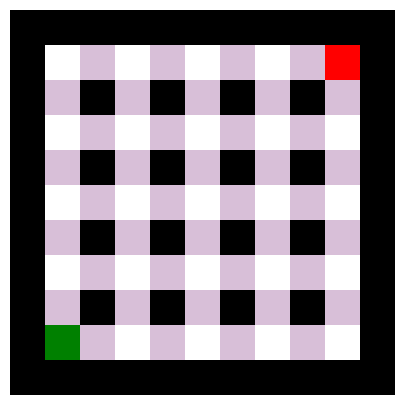
Next, we'll complete our lattice graph by drawing in all the edges between adjacent nodes. The image below (which could double as an optical illusion) fills in the edges by filling in the squares between the nodes. The start and end nodes of our maze are also filled in as green and red, respectively.
Step 2: Make it...a Maze?
As you can imagine, we can transform our grid into a maze by simply choosing whether to leave our edges as empty space, or fill them with walls...let's look first at a naive approach.
A Naive Approach
We're making a maze, so surely starting with some randomness makes sense...right?
Here's some Python code. We'll keep each node filled (not shown here), and for each edge in our list of edges, we'll get a random floating point number between 0 and 1.0 and leave that edge empty if that number is greater than or equal to 0.5. If not, we'll fill the edge in with a wall.
Alright, let's generate our maze! We'll also go ahead and fill in edges with the same color as our nodes to make this look a lot better.

Right away, we have some issues:
- Critically, there is no path from the start node (green) to the finish node (red). This maze isn't even solvable!
- Many of our nodes got left out, and can't ever be visited by someone wandering through our maze. This isn't as bad as the first problem, but it does mean large portions of our maze may end up completely unused.
Obviously, there must be a better way to decide whether an edge between two nodes should be filled in as a wall or not...
Minimum Spanning Trees to the Rescue
We'll take a step away from our little maze for a moment to discuss a much more sophisticated, but remarkably simple approach using a Minimum Spanning Tree2.
But what is a minimum spanning tree (MST)? In short, an MST is a tree structure that ensures each node of our graph is connected to every other node by exactly one route through the edges -- hence "spanning" and "tree". It also guarantees that the total weight (the sum of all edge weights) of our tree is minimized -- hence "minimum". The MST is created by taking some subset of our list of edges (we'll talk about finding this subset in a minute).
But wait...the edges between our nodes don't have a weight (or a distance, which is the same thing). Absolutely right! But don't worry -- we'll solve that shortly.
Info
This exact same technique could be done without using a Minimum Spanning Tree. The important part is that you generate some sort of spanning tree to guarantee all nodes can be reached.
The reason a minimum spanning tree is so interesting for our lattice graph is that it solves both the issues our random method had!
- Since an MST must connect every node to every other node (hence "spanning" in the name), we're guaranteed to have a path (exactly 1, as it turns out) between our start node and end node
- Similarly, the above guarantee means that every other node in our maze is also reachable -- no wasted space!
Assigning Weights
To allow us to generate our minimum spanning tree, we of course need some weights for our edges. No spoilers, but this is actually where the real magic happens.
Instead of using our random numbers to decide when to fill in an edge, we'll just assign that random number as the weight of that particular edge. Once we've done this for every edge, we have a lattice graph with a set of randomly weighted edges connecting each adjacent node to its neighbors.
Finding the MST
As much as I'd love to dig into the intricacies of Kruskal's Algorithm4 and the Disjoint-set data structure1 here, for the sake of brevity I'll leave that exploration for another time.
Instead, here is a short summary of our approach given our lattice graph with randomly weighted edges as a starting point. As noted at the top of the post, you can see code implementing all this here:
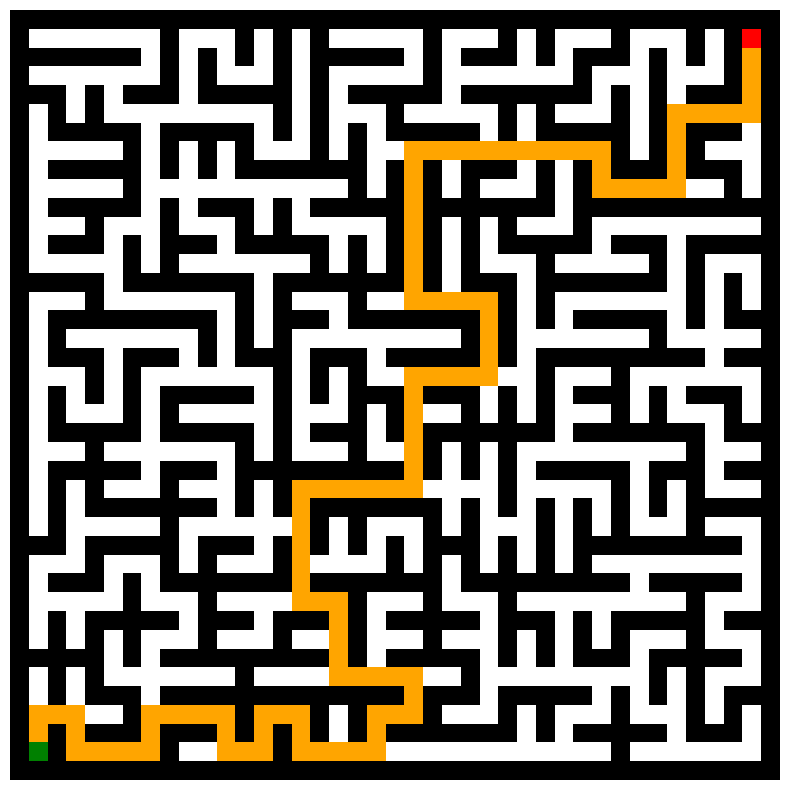
- Use Kruskal's Algorithm to calculate a minimum spanning tree of our graph
- Fill in all nodes with white (empty) and all edges as black (walls)
- For each edge in the MST, fill in those edges as white (empty).
Once we've done that...we have a maze!

Kruskal's algorithm is quite good when we have a list of edges. It makes use of a Disjoint-set structure to keep adding edges until all our nodes are part of the same set (in this case, that means connected). It also doesn't add edges that would not join new nodes together, so we don't end up with multiple paths that get to the same place.
Info
Because we're using an MST to make our maze, we won't have any cycles -- there will only ever be one path from any node to any other node. If you'd like a maze with loops, this technique won't work for your purposes!
Conclusion
Obviously, a lot of the finer details have been left out here, but the approach is really that straightforward...
- Create a lattice-grid with random weights
- Use an algorithm like Kruskal's the find the MST
- Fill in only those edges in the MST
Scaling our maze is easy too -- by simply expanding our initial lattice-grid size, we can generate mazes of any size we desire!
From here, you can imagine plenty of interesting things to do:
- Allow a seed to be specified for random number generation so you can re-generate the same maze again
- Use path-finding or maze solving algorithms to solve the maze (I found that by writing out the maze array, which was filled in with 1's and 0's for empty spaces and walls, I could input it into another program which could solve it!)
Explore the code I used for this post here.